


A snag doesn’t have to retire a technical shirt. Repairing a snag in a technical shirt may be straightforward when it’s an intact, loose loop, but a pulled or broken yarn needs more careful handling. The damage and fabric construction determine the best approach. Don’t pull at the snag, as that can distort the surrounding knit.
A damaged performance shirt can be frustrating, especially when it’s part of your regular rotation. The right approach can help protect the fabric and prevent the damage from getting worse. This guide explains how to assess a snag, choose a suitable repair method, and tell whether the shirt is ready to wear again.
You’ll also learn what can affect the repair and how to care for the shirt afterward. Small, contained snags call for a different response than stretched, torn, or visibly weakened fabric. Know the difference, make a considered repair, and get back to your routine without compromising the shirt’s performance or appearance.
Key Takeaways
- Repair time depends on whether the snag is a loose loop or has damaged the fabric; assess it before choosing a method.
- A snag repair tool can guide a loose loop to the inside of the shirt without pulling it tighter.
- Avoid cutting a raised loop: removing yarn can leave a hole or weaken the surrounding knit.
- Choose a tool that suits the fabric and snag, and keep the repair gentle to protect the shirt’s shape and finish.
Procedure duration
There’s no single repair time for every snag. A loose loop that can be guided to the inside usually takes less work than a broken yarn, widened stitch, or small tear. The knit, the snag’s location, and access to the reverse side all affect the process. A snag near a seam may need more careful handling than one on an open panel.
For a simple repair, lay the shirt flat, inspect both sides, then use a snag tool or blunt needle to ease the loop inward. Stop if the fabric puckers or the loop resists. A larger pull may need a more involved repair, and hiding a loop won’t fix a hole or weakened panel. The tool work may be quick, but assessing delicate fabric and avoiding further distortion takes care.
Decide whether to repair or replace the shirt based on the damage, not just the raised thread. Repair a stable, isolated loop if the surrounding knit remains intact. Consider replacing the garment if it has a tear, spreading runs, or damage across a high-stress area such as the underarm.
To keep a snag from worsening, stop wearing the shirt and don’t pull or cut the loop. Keep it away from zippers, hook-and-loop fasteners, and rough surfaces until you can repair it.
An iron can damage polyester or nylon if the heat is too high, so don’t press directly over a snag. Follow the care label and use lower heat only if the garment’s instructions permit it.
A clothing warranty doesn’t automatically cover snags. Coverage depends on the written terms and whether the damage is considered a defect or ordinary wear.
Procedure duration can mean the repair work itself or a later milestone, and these measures aren’t interchangeable. For a different kind of procedure, patients undergoing endovascular abdominal aortic aneurysm repair can go home in a few days after the procedure. That describes discharge timing, not how long it takes to move a loop in knit fabric. Clothing repair depends on the damage and access involved.
How to pull a snag back through technical shirt fabric with a snag repair tool
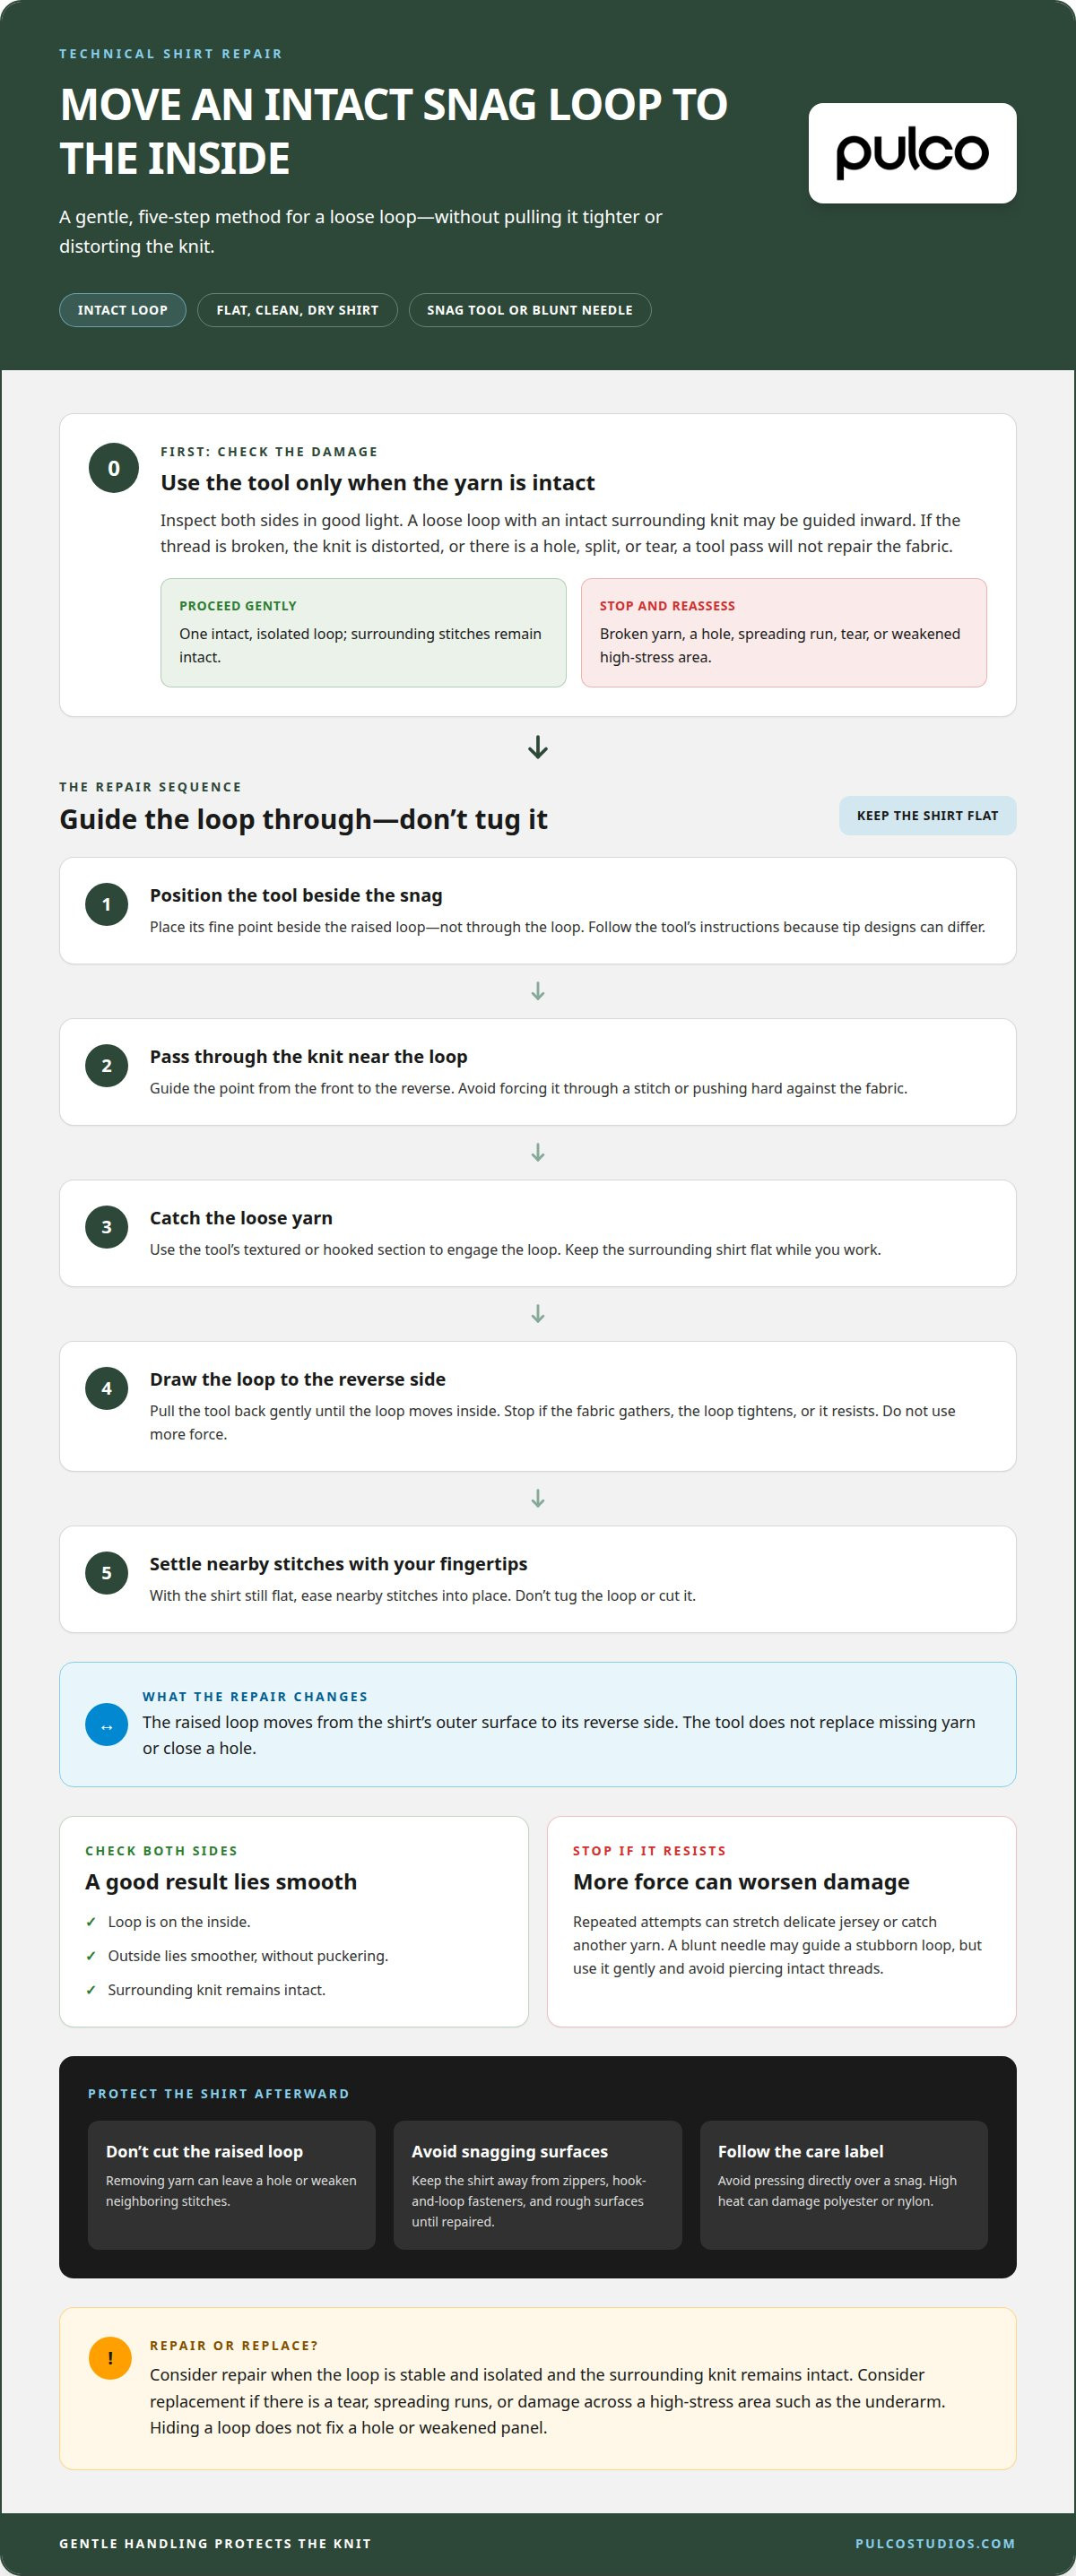
A snag repair tool moves a raised loop from the shirt’s outer surface to its reverse side. It doesn’t replace missing yarn or close a hole. Use it only when the thread is intact and the surrounding knit hasn’t split.
Start with a clean, dry shirt laid flat. Locate the snag on the outside, then turn the fabric over to see where the loop sits underneath. Smooth the area without stretching it. If the knit is distorted or the thread is broken, stop, since pulling may enlarge the damage.
- Position the tool. Place its fine point beside the snag, not through the raised loop. Follow the tool’s instructions, since tip designs can differ.
- Pass it through the knit. Guide the point from the front to the reverse near the snag. Avoid forcing it through a stitch or pushing hard against the fabric.
- Catch the loop. Use the tool’s textured or hooked section to engage the loose yarn. Keep the surrounding shirt flat as you work.
- Draw the loop through. Pull the tool back gently until the loop moves to the inside. Stop if the fabric gathers or the snag tightens.
- Settle the knit. With the shirt still flat, ease nearby stitches into place using your fingertips. Don’t tug the loop or cut it.
Check both sides under good light. The outside should lie smoother, with the loop inside and no puckering. If a large loop resists, don’t try again with more force. Repeated attempts can stretch delicate jersey or catch another yarn. A blunt needle can help guide a stubborn loop, but use it gently and avoid piercing intact threads.
Before washing or wearing the shirt, follow the care label. A successful pass hides the loop, but it won’t restore broken yarn or repair a hole.
This garment-care advice is separate from medical follow-up. After endovascular abdominal aortic aneurysm repair, patients with a stent-graft must return to their doctor regularly for CT scans to monitor its position.
Can you cut a snag on a polyester or nylon athletic shirt?
Usually, don’t cut a raised thread on a polyester or nylon shirt. The loop may be part of the knit, rather than a loose fiber sitting on top. Snipping it can remove yarn that holds neighboring stitches together, leaving a hole or opening a run. Stretching during movement can make the damage more visible.
First, inspect the snag in good light. A single intact loop lifted from the surface differs from a broken, frayed end or torn stitch. If the thread is continuous, put the scissors aside and use a suitable snag tool or blunt needle to guide the loop inward. Don’t pull it tight.
If a thread is already broken, cutting its protruding end won’t restore the fabric. Avoid trimming close to the shirt, as even a short cut can catch adjacent yarns. If a loose tail keeps catching, keep the garment away from friction and use a repair method suited to the fabric instead of cutting it repeatedly.
- Stop before cutting: check whether the loop is connected to the surrounding knit.
- Look for structural damage: a hole, ladder-like run, or spreading tear needs more than concealment.
- Protect the area: don’t tug, stretch, or rub the snag while deciding how to proceed.
Polyester and nylon can respond differently depending on the yarn, knit structure, and fabric weight. A fine performance jersey may show a small cut more clearly than a dense, stable knit. The care label guides washing and heat use, but it doesn’t make cutting a snag safe.
Repair the shirt if the surrounding stitches remain intact and the loop can be repositioned without force. If a cut has already created a hole, or the damage spreads during gentle handling, stop altering the fabric. A visible opening may need stitching or a patch suited to the garment’s construction, not another trim.
Best tools for repairing a snag in synthetic performance fabric
Choose tools that control the yarn without stretching the knit. A snag repair tool is designed to catch a raised loop and guide it through the fabric. Its fine point can work on compact jersey, while its textured end helps hold the loop. Follow the tool’s instructions and stop if it catches intact threads.
A blunt needle is a practical alternative for a small, accessible loop. It can guide yarn from the shirt’s face to its reverse without bringing a sharp point near neighboring stitches. Use a smooth needle with an eye that won’t split the yarn. Avoid pins, as their sharp tips can pierce polyester or nylon fibers.
- Snag repair tool: use it for an intact loop that needs to move to the inside.
- Blunt needle: choose it when you need precise control around a small snag.
- Bright, even light: position the shirt beneath it to distinguish a raised loop from a broken yarn.
- Small scissors: keep them for loose thread ends only after identifying the damage. Don’t cut a connected loop.
A magnifier can help show whether the yarn is continuous, especially on fine athletic jersey. Inspect both sides before choosing a tool. If the snag has become a hole or the knit has a spreading run, a loop tool won’t restore the missing structure. Avoid adhesive tape, which can pull delicate yarns when removed.
Lay the shirt flat, support the fabric around the snag, and use light pressure. Don’t stretch the panel over a hand or pull against a seam. After moving an intact loop, check the reverse for bunching and the front for puckering. Stop if either appears, since another pass can distort the knit.
Build a compact repair kit around a snag tool, a blunt needle, bright light, and small scissors. Keep scissors away from raised loops. For a fresh performance rotation, explore technical playing shirts suited to an active kit.
Pulco Studios
Pulco Studios gives padel players a performance-focused apparel option when a snagged shirt is beyond a simple repair or ready to be replaced. Its range includes the Aircon Playing Shirt - Black, the Aircon Raglan Playing Shirt Sky Blue, and the CIMORO x PULCO - Padel Pack, alongside specialized outerwear such as the Coaches Rain Jacket. Choose apparel that fits your playing routine, then use the care label to guide washing and heat exposure. A careful repair can preserve a shirt; a considered replacement keeps your kit moving when the fabric is damaged beyond a tidy fix. For questions about Pulco Studios apparel, contact Pulco Studios.
Keep Your Kit Ready for the Next Session
A snag is a good reason to take a more deliberate approach to caring for your gear. Make garment care part of your routine: notice changes early, handle performance fabric gently, and match the repair to the damage. A considered approach to repairing a snag in a technical shirt helps you decide whether to preserve the piece or refresh your playing kit.
That choice is personal. Consider how the shirt fits your routine, how the fabric feels after repair, and whether you still feel confident wearing it on court. If you’re looking for apparel for your next session, Pulco Studios offers options including the Aircon Playing Shirt - Black, the Aircon Raglan Playing Shirt Sky Blue, and the CIMORO x PULCO - Padel Pack.
Contact Pulco Studios to continue the conversation about your padel apparel. Keep your kit considered, your movement unrestricted, and your next session in sight.
Frequently Asked Questions
How do you repair a snag in a technical shirt without damaging the fabric?
When repairing a snag in a technical shirt, don’t pull the thread or stretch the panel. Check whether it’s an intact loop or broken yarn, since sewing or trimming the wrong one can worsen the damage. Work on a flat surface, use a blunt tool, and stop if the knit puckers. If the fabric has a hole or spreading run, hiding the snag won’t restore it.
How to care for a technical shirt after repairing a snag
Follow the care label before washing or wearing the shirt. Handle it gently and keep it away from zippers, hook-and-loop fasteners, and rough surfaces to prevent further snags.
